
*AD – the board in this review was gifted to our household for this post. All opinions, as always, are our own.
We eat a lot of charcuterie boards. Often, in the evenings, after the sun has set, we’ll have a glass of something nice and create a little charcuterie board to eat while watching a movie or hanging out on the couch. Charcuterie boards are big boards of meat, cheese, olives and more, which can be eaten as a snack or light meal, depending on what you stack on top of yours. These boards can be as simple as throwing some cheese and nibbles onto a board or as fancy as adding a bunch of different categories of foods, pates, crackers, etc to really load up your board. We are going to talk about creating an epic board, one that would be an eye catcher at gathering or super enjoyable if you want to feel fancy and enjoy a snack.
Let’s Talk Boards & Accessories
When it comes to a charcuterie board, you’ll want something of decent size, that’s dedicated to the art of charcuterie boards and isn’t used for cutting meats or full of cuts itself. We have a beautiful Tru Bamboo’s Large Cheese Board which is our favourite to use. This board is really long, which is good when it comes to being able to reach all of the items on the board. This is a huge feature and the board can really hold a lot – you’ll end up with enough bits to easily feed two people. We’ve also used this board for our pancake charcuterie – it’s really versatile. There is also a little drawer within the cheese board that contains cheese knives – these tools are very useful for charcuterie boards too, and you’ll want to get some cheese knives anyway, so having a board that actually holds your knives is so smart. The Tru Bamboo board also comes with some really nice cheese makers, if you want to label what cheese you have on your board. These are dry-erase and quite fun.

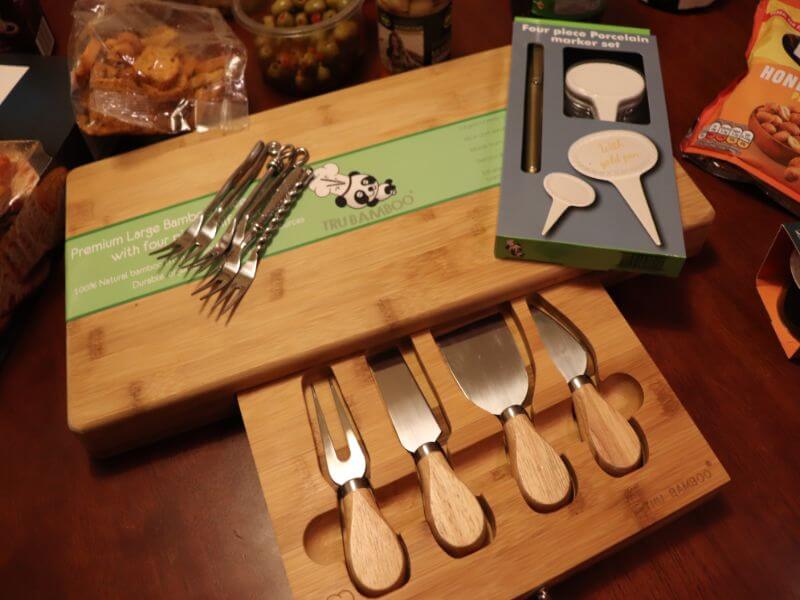
You’ll also want to get some small bowls that fit well on your board if you are one to have items not touching no matter what – we move our board from room to room and often eat it in the living room, so we don’t use bowls but find them perfect when entertaining, so that items don’t contaminate other items on the board. We do, however, regularly use a set of two-pronged forks to grab items like olives off the board and eat them without getting our fingers dirty.
Cheese & Meats
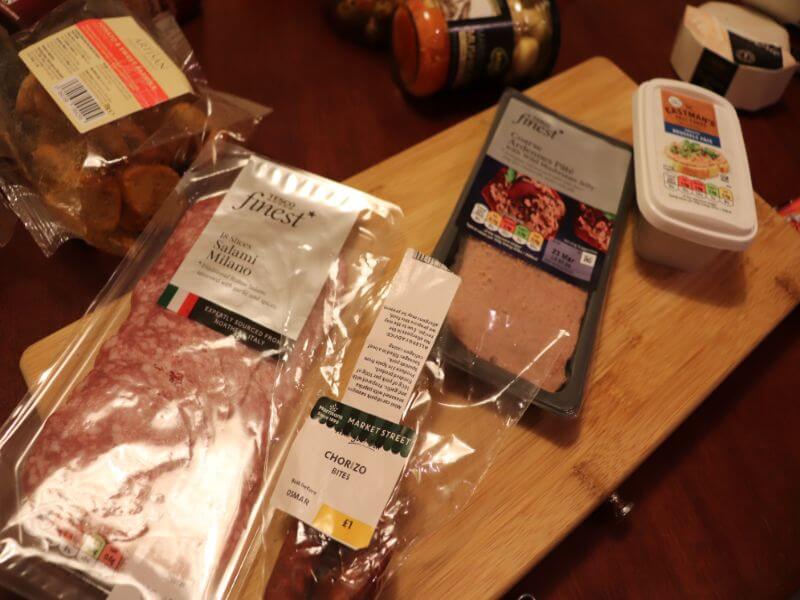
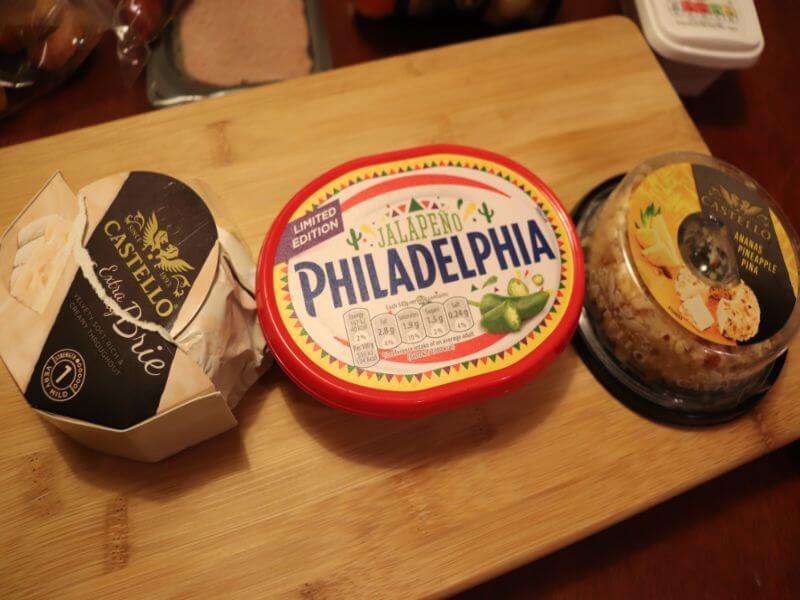
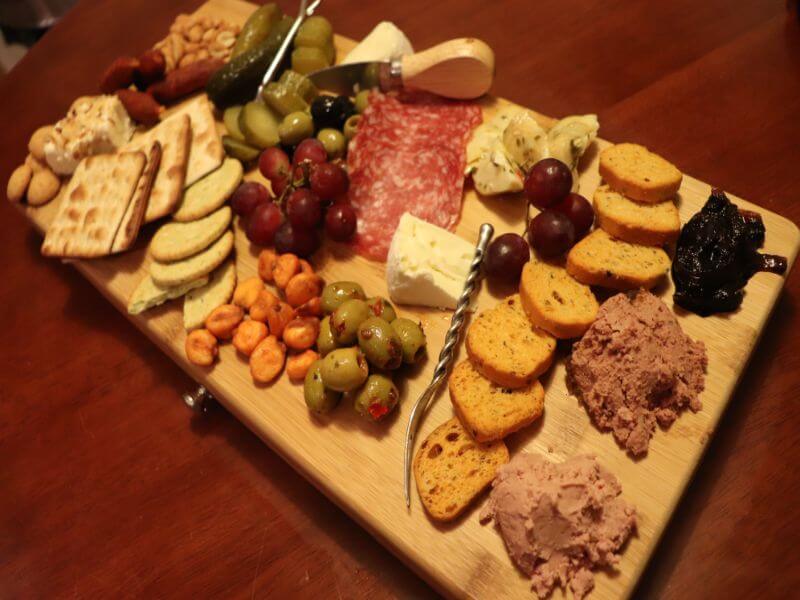
The main food on your cheese board is cheese and meats. You can choose whatever you’d like, really, as long as you have a variety. We always have a nice wedge of brie, normally some cheese that have fruit in them like wensleydale, soft cheeses that work well for spreading and often a single hard cheese like cheddar. We tend to like softer cheese on our board, as these are better for spreading on crackers or other crunchy items. We place these as centre pieces onto the board, giving a bit of room to get to them and cut them. When it comes to meats, we grab a bunch of different cured meats that are thinly sliced or are small, bite-sized chunks. These meats can be mixed with the cheese on crackers or ate on their own. Some good starts are chorizo and hard salami, but it’s also great to have pate on your board, in case people would like a more spreadable meat. We tend to dollop pate in one place, lay out the sized meat and pile up meat chunks.
Crackers, Crunchy Bites & Breads

Once you’ve got your meats and cheeses sorted, you’ll want to get some crackers and crunchy items to eat with your cheeses and meats. There is a large variety of different crackers bread sticks, cheese crumbly bites, hard bread-crackers and much more. These items are fun to experiment with and add here and there to your board. We’ve even found little dried corn puffed items and crunchy mini-crackers as a fun addition to our board. We normally pile up a few different crackers near the cheese that might fit best, while we place the bread bits near pate and put crunchy bites randomly around the board.
Pickled Stuff

One of our favourite parts of a charcuterie board is the pickled stuff. There are so many different pickled items that you can put on your board – olives being the classic pairing. We enjoy spicy olives, marinated in chili flakes, but you can add a few different types of olives as well as other pickled items like gherkins, pickled mushrooms and artichoke hearts. Pickled items need to be properly placed on the board, as they are pickled in a liquid and you do not want the liquid seeping into other items. This is where small bowls are sometimes used, however, we tend to just drain the liquid off as best we can and it doesn’t cause much of an issue. Big items like large gherkins can be chopped into bite-sized pieces, so that they make for more of a single bite. Pickled items are normally added in generous piles around the already placed items, filling up bigger gaps. You can also get chutneys that go great with different cheeses, a good chutney dollop on the side of the board, never did a charcuterie board any wrong.
Fillings

At this point, your board should be pretty full, but there are probably a few gaps here and there. We tend to fill these smaller gaps with things like nuts and grapes. Grapes can be left on the stem, which makes them more visually striking and keeps them in a pile. Nuts are fun to eat and can be piled up in small spots between items, which acts as a small thing to eat in between snacking on other items on the board. The idea is to keep a variety of textures and tastes on the board, while only having a little bit of each item. You can always top up on more crackers, olives or fillings as they’ve been eaten.

With all of these different types of foods, you’ll quickly end up with a full board that’s super tasty to enjoy. A lot of these items can be customised to exactly what you and your guests want to eat – if you don’t like brie but instead enjoy blue cheese, put that on your board. Spend some time trying out new little items and placing them onto your board before tasting them – seeing exactly what goes well with your favourite pate or chutney.
This looks amazing! Xx
-Kyra
Thank you!
This looks like such a good selection! I always think the board is so much better when there’s a variety of textures on offer. You’ve presented it beautifully too x
Sophie
Texture is a good thing to have! Thank you.